How to Sync Webflow with FTP: Automate Your Website Exports
Webflow is widely recognized as one of the most powerful visual web design tools available today. It allows designers to create professional, high-performance websites without writing a single line of code. However, as your project grows or as you start managing multiple client sites, the recurring hosting fees can become a significant overhead. Many users eventually find themselves asking: How can I get my site out of Webflow and onto my own server without losing the features I love?
The answer lies in automation. Specifically, syncing your Webflow project with an FTP (File Transfer Protocol) server. In this guide, we’ll explore how you can download your Webflow site and automate the export process directly to your hosting provider using ExFlow.
The Cost of Convenience: Why Move Beyond Webflow Hosting?
Webflow’s hosting is excellent for those who want a truly hands-off experience. But for agencies, freelancers, and businesses looking to scale, the costs add up. When you host with Webflow, you aren't just paying for server space; you’re paying for the convenience of their ecosystem. While this is great initially, you may eventually hit limits on CMS items, bandwidth, or simply find that Webflow hosting is too expensive compared to standard static hosting or VPS solutions.
By moving to a self-hosted model, you gain:
- Significant Cost Savings: Static hosting on platforms like AWS S3, Cloudflare Pages, or even a traditional FTP-based shared host can cost pennies compared to $20+ per month.
- Ultimate Flexibility: You have full control over your server configuration, header security policies, and custom backend integrations.
- Ownership: You own the files. If you ever need to migrate again, you just move the folder.
The Manual Struggle: HTTrack and the 'Broken Export' Problem
Many users first try to use generic scrapers like HTTrack to export Webflow sites. Unfortunately, Webflow's modern architecture—filled with complex interactions, dynamic CMS data, and lazy-loaded assets—often breaks when using these tools. You might find missing images, broken animations, or forms that simply don't submit. This is because generic scrapers don't understand how Webflow scripts are bundled.
This is where a specialized tool like ExFlow changes the game. Unlike generic tools, ExFlow is built specifically for the Webflow and Framer ecosystems. It ensures that every script, style, and CMS page is captured perfectly, ready for a production environment.
Automating the Flow: Syncing Webflow to FTP
Automation is the key to maintaining a productive workflow. You don't want to manually download a ZIP file and upload it via FileZilla every time you make a small change in the Webflow Designer. You need a bridge that automatically pushes those updates to your server.
Step 1: Prepare Your FTP Credentials
To begin, you’ll need the FTP or FTPS credentials for your web server. This usually includes:
- Host: The server address (e.g., ftp.yourdomain.com).
- Username: Your FTP account name.
- Password: Your secure password.
- Port: Usually 21 for FTP or 22 for SFTP.
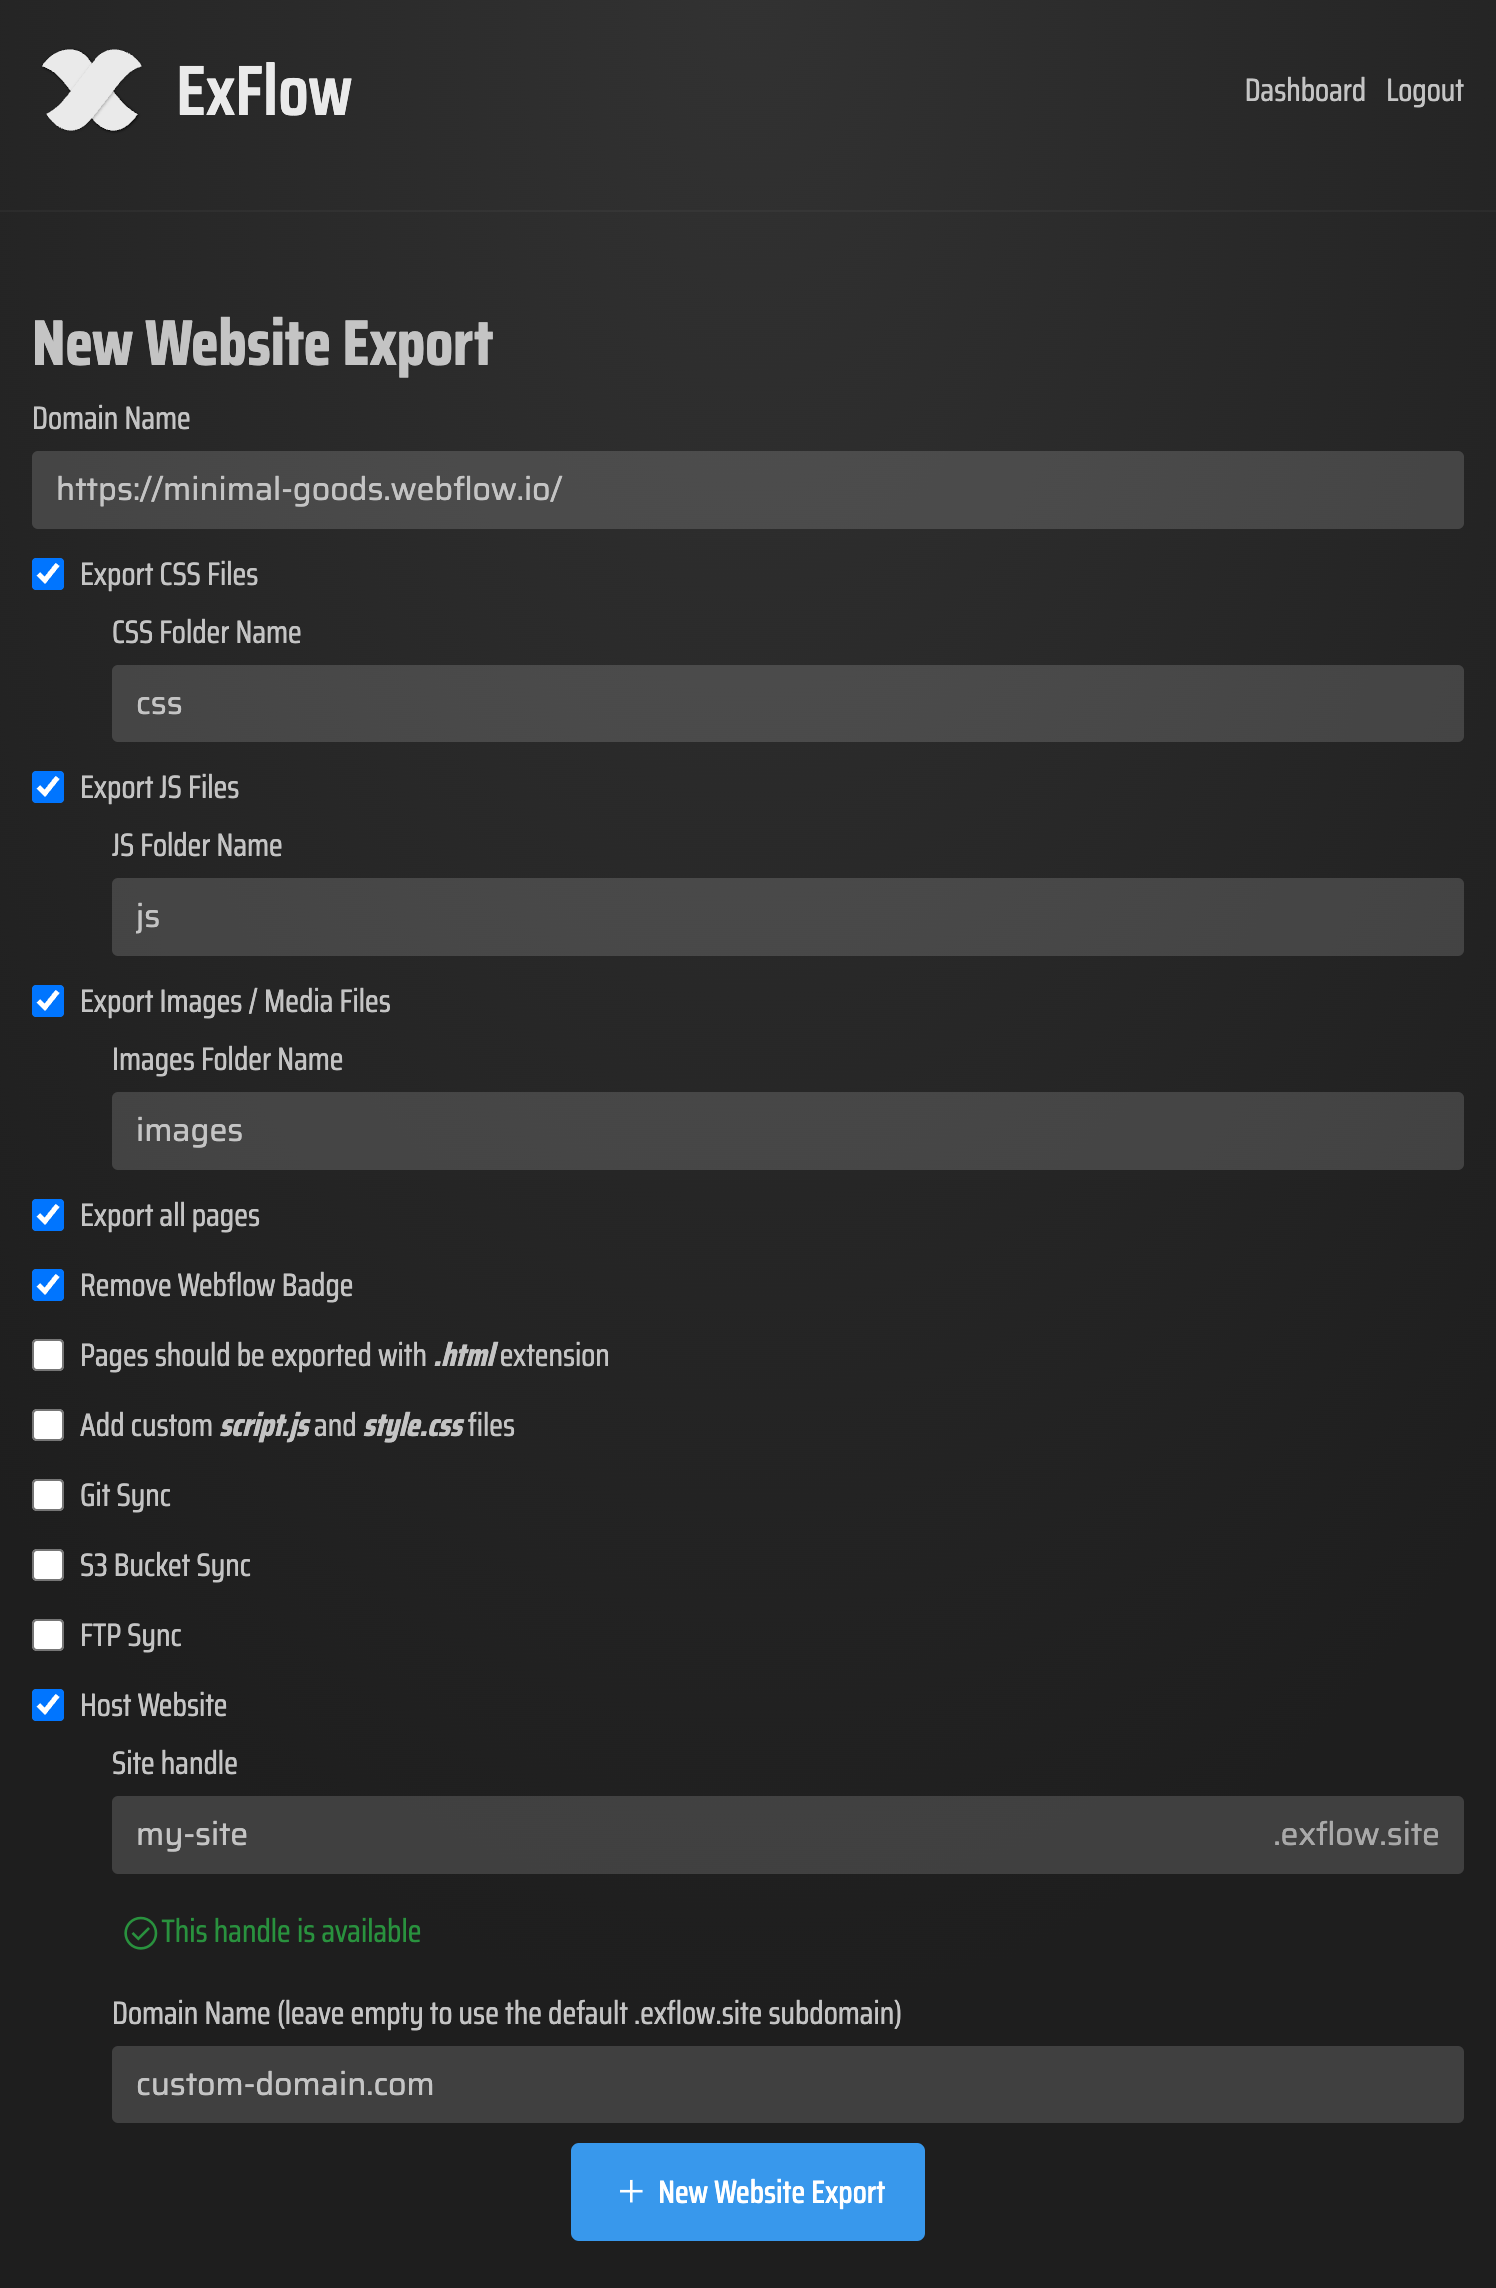
Step 2: Configure ExFlow for Automation
Instead of a one-time export, ExFlow allows you to configure a "Sync" target. Here is how you set it up:
- Enter Your Site URL: Paste your Webflow staging or custom domain URL into ExFlow.
- Select Export Settings: Choose to export all pages, including CMS content. You can also opt to remove the "Made in Webflow" badge automatically.
- Choose Sync Type: Select 'FTP' from the integration options.
- Provide Credentials: Securely enter your host, user, and path details. ExFlow supports FTPS to ensure your data is encrypted during transfer.
Step 3: Trigger the Sync
Once configured, ExFlow will crawl your site, generate the static files, and push them directly to your server. This effectively turns Webflow into a headless CMS where you design visually, and ExFlow handles the deployment.
Why FTP Sync is Better Than a Simple Download
While downloading a ZIP is fine for backups, backing up a Webflow site locally is only half the battle. If you are running a live site, you need consistency. Automation via FTP ensures that:
- No Files are Missed: Manual uploads often result in forgotten CSS files or broken image paths.
- Speed: ExFlow uses optimized synchronization, meaning it only updates what has changed, making your deployments lightning fast.
- Version Control Compatibility: If your FTP server is linked to a deployment pipeline, you can even sync to a Git repository, as seen in this tutorial:
https://www.youtube.com/watch?v=Zvw0qiUKBYk
Security Best Practices for FTP Transfers
When automating your exports, security should be a top priority. Plain FTP sends your credentials in clear text, which is a major risk. Always use FTPS (FTP over SSL) or SFTP when configuring your sync in ExFlow. This ensures that your server remains secure while enjoying the benefits of automated deployments.
Additionally, consider creating a dedicated FTP user that only has access to the specific folder where your website files reside. This follows the principle of least privilege, minimizing the impact if credentials were ever compromised.
Conclusion: Take Back Control of Your Hosting
You shouldn't feel locked into a specific hosting provider just because you love a specific design tool. By using ExFlow to sync your Webflow project with an FTP server, you combine the best of both worlds: the world-class design interface of Webflow and the cost-efficiency of self-hosting.
Whether you are an agency looking to reduce costs for clients or a developer who wants more control over their stack, automating your Webflow exports to FTP is the ultimate workflow upgrade.
Ready to stop overpaying? Head over to ExFlow.site and start your first automated sync today.